Windows 10 Proxy Setup Guide: Step-by-Step Proxy Configuration
Windows 10 Proxy Setup Guide: Step-by-Step Proxy Configuration

To work comfortably through a popular proxy protection server, proper configuration is important. In this article, we provide a detailed guide on how to set up a proxy server in Windows 10 to protect your computer from potential threats while working on the global Internet.
Step-by-Step Instructions to Set Up a Proxy in Windows 10
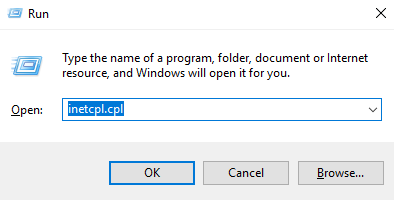
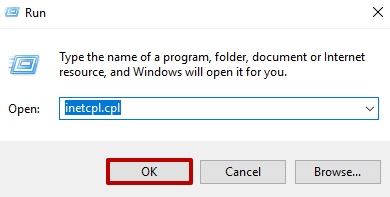
- First, you need to press the "Win" + "R" key combination. A window will appear where you need to enter "inetcpl.cpl".
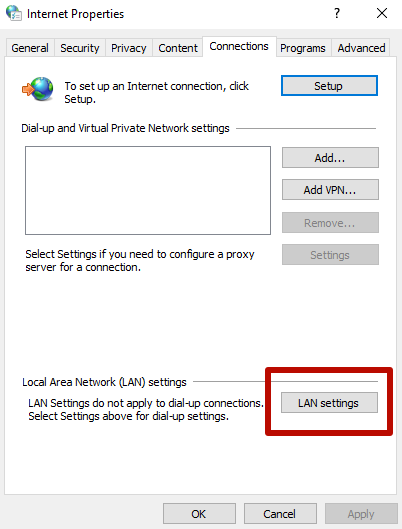
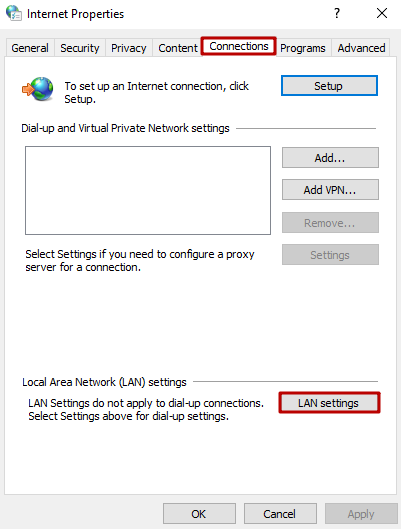
- In the next window that opens, go to the "Connections" tab and check the box in front of "LAN settings".
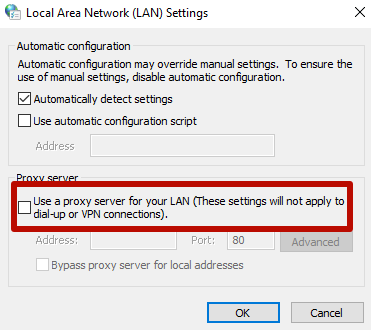
- Proxy server in Windows 10 can be connected in two ways: automatic or manual. If configuring the proxy server manually, you need to provide the server address along with the port number for the system. If it is done automatically, such actions will not be necessary. Click "Use a proxy server for your LAN" and go to "Advanced".
- Next, enter the proxy data. You should enter a server IP address in the first field. Pay attention to the note - 1 proxy server for all protocols. Check the box.
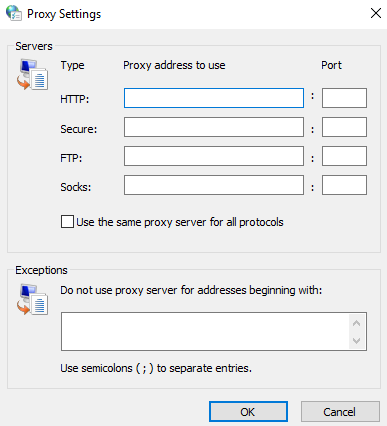
- Enter the websites that don't require the proxy server (if necessary).
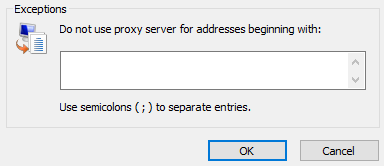
An important step is to save the changes. Now you know how to configure proxies in Windows 10.
Disabling Proxies in Windows 10
You can disable the proxy server in Windows 10 by following the method used for the updated version, paying attention to all the parameters.
Currently, all browsers use the operating system's proxy system, so disabling it in Windows is the same as disabling it in the browser (except for Mozilla Firefox).
The reasons for such action may include:
- inability to access specific websites;
- malware already using a proxy;
- errors in parameter settings.
Proxy settings in Windows 10 have been duplicated in the updated interface. Then, we recommend learning the instructions for disabling proxy settings more detailed.
Disabling Proxies in Windows 10
- Open the "Internet Options" window by pressing "Win + R" and entering "inetcpl.cpl". Press OK:
- In the "Internet Properties" window that opens, select the "Connections" tab and click the "LAN settings" button:
- In the "Local Area Network (LAN) Settings" window, uncheck the boxes "Use a proxy server for your LAN" and "Bypass proxy server for local addresses". Then click "OK":
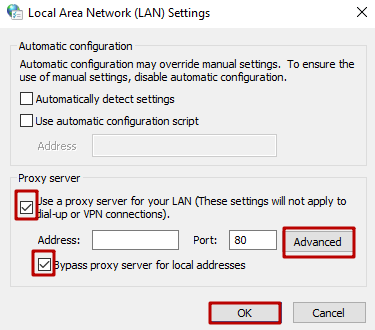
Important! In Windows 10 settings, proxies can only be disabled for local Internet addresses while remaining enabled for the rest.
The recommended way to disable proxy settings in Windows 10 is to disable them in the browser. After the reasons for the disconnection decision have been resolved, the proxy server can be reconnected by following the suggestions given in the article.
Learn more about proxy settings for different sites using the Proxifier program.

Windows 7 Proxy Setup Guide: Step-by-Step Proxy Configuration
Windows 7 Proxy Setup Guide: Step-by-Step Proxy Configuration
Windows 8.1 Proxy Setup Guide: Step-by-Step Proxy Configuration
Windows 8.1 Proxy Setup Guide: Step-by-Step Proxy Configuration
Google Chrome Proxy Setup Guide: Step-by-Step Proxy Configuration
Google Chrome Proxy Setup Guide: Step-by-Step Proxy Configuration